
Look what I found
That’s right, it’s my blog! The one that I definitely don’t neglect at all. And to prove it, I’m going to make a new bi-decennial post ahead of schedule (even if Gitea disagrees, but who can blame it, right? January 2020 definitely feels like 5 years ago even if we’re just half-way through 2024)
I bought a cheap minimal board with EPM240 CPLD for some experiments. First problem became clear before it even arrived: Quartus Prime, the development suite provided by Intel for their FPGAs and CPLDs, doesn’t support the MAX II device family to which EPM240 belongs. Well, it actually does, I’m just dumb and I mistook it for Cyclone II FPGAs during my research. I could have saved a lot of time if I read the support matrix properly, but then I wouldn’t have a VM running Quartus II, would I?
Yeah, about that, I’m apparently a masochist, so instead of
installing some old CentOS (Quartus II officially supports RHEL 4 and 5,
so ideally a matching version), I installed Rocky Linux 9 and just mixed
and matched the missing 32 bit packages from older CentOS repos. And it
worked without any problems, somehow. The biggest issue I encountered
was missing libncurses.so.5, but you can just symlink it to
libncursesw.so.6 and everything that Quartus wants will
work just fine.
I wrote a simple blink “program”, wrote timing constraints for the IO to shut up the timing analyzer (and ensure that the chip can actually handle a counter running at the 50 MHz provided by the board - which it definitelly should) and compiled it to be ready to flash it when the CPLD shows up.
module Blink (
  input logic clk_r,
  output logic led_o
);

  clkdiv clkdiv_u (
    .clk_r(clk_r),
    .div_clk_r(led_o)
  );

endmodule

module clkdiv #(BITS = 24) (
  input logic clk_r,
  output logic div_clk_r
);

  logic[BITS-1:0] counter = 0;

  assign div_clk_r = counter[BITS-1];

  always_ff @(posedge clk_r)
    counter <= counter + {{BITS-1{1'b0}}, 1'b1};

endmodule
Oh, and the VM also has a functioning install of ISE Webpack, Xillinx/AMD’s alternative to Quartus II. That one was a bit tougher to get going, and I think its pin planner might still be broken, but I’m not pulling the trigged on yet another ancient CPLD just yet, so that can wait for now.
The package has arrived. Everything that should be inside is there, that’s good.
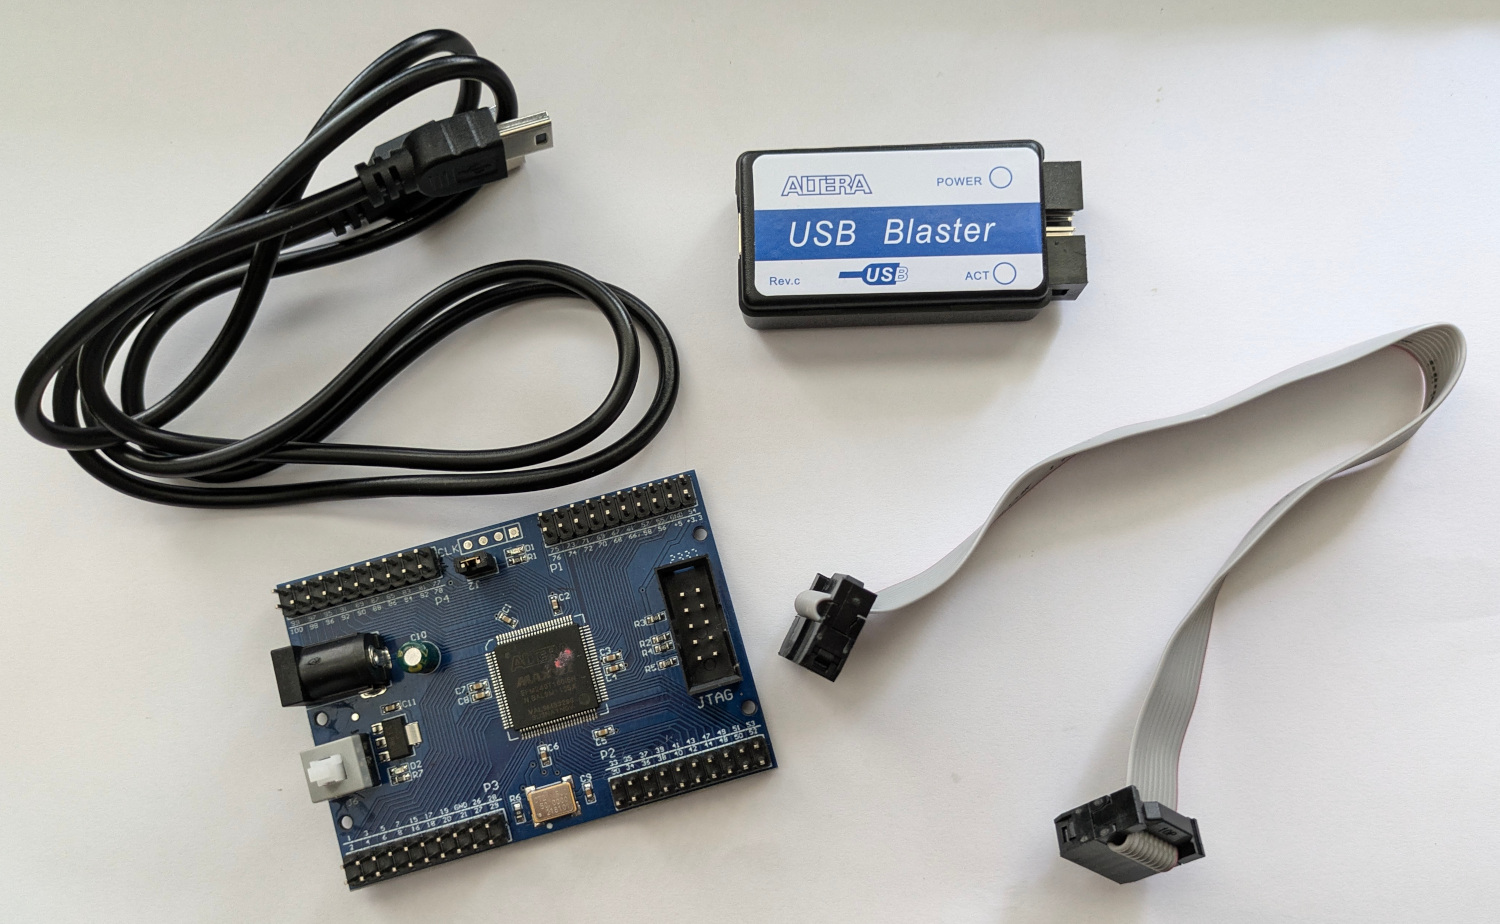
But wait, how do I power it? I have a bunch of power supplies with a DC jack at home, sure, but now that this thing is here, I realize that I don’t know what voltage range is it designed for. There’s nothing on the silkscreen. But the board is pretty barren - a grand total of one CPLD, one mysterious chip that has to be a voltage regulator, a 50 MHz crystal, two LEDs and then a bunch of resistors and capacitors. I can just trace the connections with a multimeter.
First I checked if the DC connector is center-positive - it is, good. Then I verified that the center pin goes to the suspected voltage regulator - once again, it does. So I checked the markings on the chip, looked up the letters and found out that it is AMS1117-3.3 voltage regulator and can take up to 12 volts. Perfect, that’s the power supply I want to use. Now just a quick check of the big capacitor next to the voltage regulator and we can try to power it up! Wait… what?
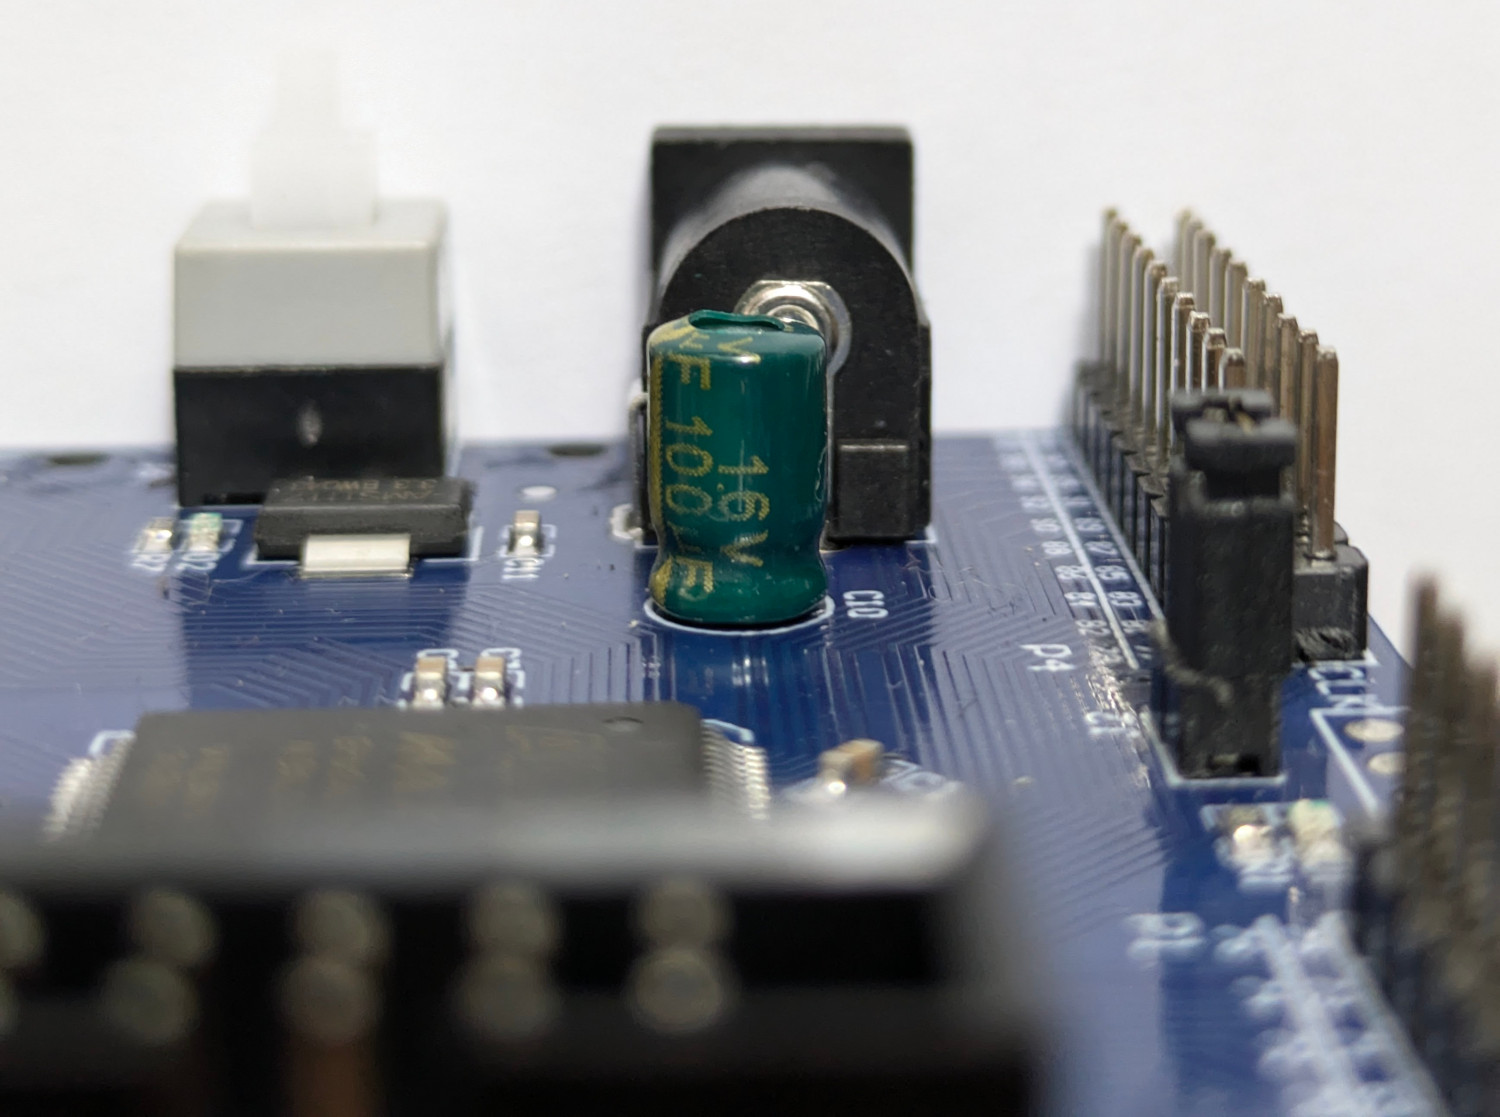
Is that… is that a decimal point? Is there seriously a 1.6 V capacitor connected across the DC input that has to be at the very least 3.3 V for the CPLD to function? I’m far from an expert on this, I know just about enough about analog electronics to be a danger to myself, but this doesn’t seem good. I also know that being around a blown electrolytic capacitor can be pretty unpleasant, so I wanted to be sure that it won’t happen.
Searching online calmed me down though. It doesn’t seem like anyone’s selling 1.6 V capacitors, the closest matches actually being sold are 16 V and 1.6 kV. I’m not holding my breath for this knockoff board to come with the latter, but the former is still perfectly fine for me and would make sense on a 12 V input. And I don’t believe there is some niche factory somewhere making unusual capacitors just for fake boards - surely that would be more expensive than a mass produced standard option.
All right, let’s go. I’ve plugged in the power supply, and… nothing. There’s no activity, neither of the two LEDs is on. Turns out the big button is actually a toggle button and works as a power switch, after pressing it the LED near the DC connector lit up and the other LED started blinking rapidly. Cool, that’s about as much as I could’ve hoped for, let’s get programming.
I connected the USB Blaster to my PC, ran lsusb and was
satisfied to see ID 09fb:6001 Altera Blaster in the output.
I redirected it to the VM with Quartus, verified that it also sees it,
opened the Quartus Programmer, picked USB Blaster in the Hardware Setup
window, clicked Start, and… error! Yay, let’s figure out why an ancient
piece of proprietary software running on an unsupported OS in a VM has
trouble talking to an old USB device!
The programmer window provided no feedback of the error, the only
indication that something went wrong was the fact that it finished
almost instantly. The system log in the main Quartus window was only
marginally more useful - it reported error codes 89 and 44 in the JTAG
server with no further messages. Initial search led me to believe that
Quartus might require the usbfs filesystem to be mounted
(which would be a problem, since that thing is long gone from modern
Linux kernels), but thankfully it was just a permissions issue. I cannot
recreate it now, but I believe running Quartus as root (yes, bad idea,
but I don’t really care in a VM) gave me a different error.
Anyway, I got closer to being able to use the USB Blaster by creating
a file /etc/udev/rules.d/60-blaster.rules containing a
single line:
SUBSYSTEM=="usb", ATTR{idVendor}=="09fb", ATTR{idProduct}=="6001", MODE="0666"
(you might need to modify this depending on your Blaster’s VID:PID -
there are different ones. You want to match idVendor and
idProduct to whatever you get from lsusb).
Now when I click on Start in the programmer window, I get to wait for
20 seconds for a timeout, after which I get the good old error 44. And
that’s the end of my journey with Quartus, I tried a few things but
nothing worked. The jtagconfig program distributed with
Quartus says “Hardware not attached” every time I use it (it sees the
Blaster itself).
After some searching online, I found out that the Blaster clones have a wide range of possible issues. Some clones apparently refuse to work on Linux, some are plain incompatible with some chips unless you modify them… So I cracked mine open.

A STM32 MCU and not much else. I found some hardware modifications
for other STM32 based clones, but they mostly had to do with fixing the
voltage for the level shifter and this clone doesn’t even have one. Then
I found various GitHub repos with USB Blaster firmware for STM32, and
tried flashing them to one of my BluePill boards with supposedly genuine
STM32F103. Not a single one of them managed to properly communicate over
USB (lsusb would freeze for about 2 seconds after
connecting to my PC and then wouldn’t show anything new;
dmesg output contained errors about “device not responding
to setup address” and then timing out).
Yes, looking back I realize that flashing random firmware onto a microcontroller and then connecting it to my PC over USB might not be the smartest idea, but I didn’t realize that while cycling through all the projects.
Finally, I found the DirtyJtag project. It
isn’t supported by the Quartus programmer, but it should work on the
BluePill and is supported by the open source programmer/debugger project
openocd. So I flashed the binary
provided on the Releases page, checked that it at least properly
initializes USB, and sure enough, it showed up in lsusb!
And at this point I realized that I have no clue how to use the
openocd.
At this point, I’ve discovered Hagen’s blog post Programming the EPM240 devboard on Linux. And would you look at that! Same issues with Quartus and a USB Blaster clone! And their clone works fine with openocd. So I decided to give it a try, after all I would be happy to continue using the programming cable instead of connecting individual pins of the JTAG connector to my BluePill and hoping I won’t make a mistake. I followed the guide and everything went fine - when I started programming, the blinking LED switched to a faint glow, then… began blinking exactly the same way as before?
Huh, maybe it doesn’t work? But I’m so close… Then it dawned on me - did I accidentally match the factory blink “program”? Quick math showed me that dividing the 50 MHz clock with a 24 bit counter gives you about 1.5 Hz, and that looks pretty close to the frequency at which the LED blinks. So I went back to Quartus, changed the counter to 26 bits to slow it down, compiled, programmed, and sure enough, the blinking slowed down. Success!
In total, this took me about two days of time - one day for setting up the Quartus/ISE, second for all the fiddling with the actual hardware once it arrived. I have barely touched any MCU or dev board since my last blog post about the BluePill 4.5 years ago and I genuinely forgot how much fun dealing with janky hardware actually is - the feeling that whenever you solve a problem, you’re pretty much guaranteed to run into two others around the corner, and then the sudden realization that you’ve just solved the last big problem in your way… priceless.
I look forward to getting back to tinkering with embedded stuff, and maybe even writing some blog posts - this took me another half day, but putting everything together like this was also pretty enjoyable.
Also, the scripts for my blog required some maintenance and I’ve added the ability to embed images (much wow!).
See ya